Working with the database: Difference between revisions
Itsmeowdev (talk | contribs) m (Remove captions) |
Itsmeowdev (talk | contribs) m (→Setup MariaDB (Windows): Size up images) |
||
| Line 1: | Line 1: | ||
= Database Setup = | = Database Setup = | ||
When developing, it is useful to have a local database set up, for a variety of reasons. | When developing, it is useful to have a local database set up, for a variety of reasons. | ||
| Line 9: | Line 8: | ||
<span id="setup-mariadb-windows"></span> | <span id="setup-mariadb-windows"></span> | ||
== Setup MariaDB (Windows) == | == Setup MariaDB (Windows) == | ||
Download and install [[mariadb:|MariaDB Community Server]] for your operating system. Be sure to install the following components: | Download and install [[mariadb:|MariaDB Community Server]] for your operating system. Be sure to install the following components: | ||
* Database Instance | * Database Instance | ||
* Client Programs | * Client Programs | ||
* HeidiSQL | * HeidiSQL | ||
[[File:Db_setup-6ce6ffea237bf219c2b91d392f48b2099b7930ae.png|thumb|none|alt=image|452x452px]] | |||
[[File:Db_setup-6ce6ffea237bf219c2b91d392f48b2099b7930ae.png|thumb|none|alt=image]] | |||
Set a root password, something you will remember. It doesn’t need to be properly secure if it's for local testing, since you won’t be storing anything or hosting it publicly. Do '''not''' enable remote access for root. | Set a root password, something you will remember. It doesn’t need to be properly secure if it's for local testing, since you won’t be storing anything or hosting it publicly. Do '''not''' enable remote access for root. | ||
[[File:Db_setup-559f5ff4e926edda40dd87a6274c774a6b9772e0.png|thumb|none|alt=image|449x449px]] | |||
[[File:Db_setup-559f5ff4e926edda40dd87a6274c774a6b9772e0.png|thumb|none|alt=image]] | |||
Install it as a service, with networking enabled. The default settings are fine. This means it will run 24/7 in the background. You can manage this in the Windows Services viewer. | Install it as a service, with networking enabled. The default settings are fine. This means it will run 24/7 in the background. You can manage this in the Windows Services viewer. | ||
| Line 27: | Line 20: | ||
Open HeidiSQL, Click on new to create a new session, check prompt for credentials and leave the rest as default. | Open HeidiSQL, Click on new to create a new session, check prompt for credentials and leave the rest as default. | ||
[[File:Db_setup-5268ec389c6fcf8f2ff1aa84a382090c1e5278ae.png|thumb|none|alt=image|632x632px]] | |||
[[File:Db_setup-5268ec389c6fcf8f2ff1aa84a382090c1e5278ae.png|thumb|none|alt=image]] | |||
Click save, then click open and enter in root for the username and the password you setup during the installation. | Click save, then click open and enter in root for the username and the password you setup during the installation. | ||
[[File:Db_setup-f8c2d10d5769c57f387e0eadf1c6e67842814ac3.png|thumb|none|alt=image|638x638px]] | |||
[[File:Db_setup-f8c2d10d5769c57f387e0eadf1c6e67842814ac3.png|thumb|none|alt=image]] | |||
Right click on the server entry in the left side plane (the area with <code>information_schema</code>, <code>mysql</code>, etc) (the server entry will be the first one) and go to <code>Create new -> Database</code> | Right click on the server entry in the left side plane (the area with <code>information_schema</code>, <code>mysql</code>, etc) (the server entry will be the first one) and go to <code>Create new -> Database</code> | ||
[[File:Db_setup-245204aa1d0f17218e2eb1f4a0dd4a2432696ae6.png|thumb|none|alt=image|484x484px]] | |||
[[File:Db_setup-245204aa1d0f17218e2eb1f4a0dd4a2432696ae6.png|thumb|none|alt=image]] | |||
You can name it anything at this step. The default config is <code>ss13beedb</code>, so go ahead and use that. Don’t name it <code>test</code>, or you will have security issues. | You can name it anything at this step. The default config is <code>ss13beedb</code>, so go ahead and use that. Don’t name it <code>test</code>, or you will have security issues. | ||
[[File:Db_setup-598a1178e842219e1b0ae9dc12f2ef27aafbf2de.png|thumb|none|alt=image|319x319px]] | |||
[[File:Db_setup-598a1178e842219e1b0ae9dc12f2ef27aafbf2de.png|thumb|none|alt=image]] | |||
Select the database you just created and then go to <code>File -> Open SQL File</code> and open the file <code>beestation_schema.sql</code> file located at <code>SQL/beestation_schema.sql</code>. You can also find it [[beereporaw:master/SQL/beestation_schema.sql|here]], but it may be newer than the version you are using. If it asks you to auto-detect, hit Yes. Ignore any “access violation” errors, the import works anyway. | Select the database you just created and then go to <code>File -> Open SQL File</code> and open the file <code>beestation_schema.sql</code> file located at <code>SQL/beestation_schema.sql</code>. You can also find it [[beereporaw:master/SQL/beestation_schema.sql|here]], but it may be newer than the version you are using. If it asks you to auto-detect, hit Yes. Ignore any “access violation” errors, the import works anyway. | ||
[[File:Db_setup-f0f38f6cd445af32da096c835d2492727b091f3f.png|thumb|none|alt=image|484x484px]] [[File:Db_setup-B8634fc2985464e926572ac826faa7b4379f3653.png|thumb|none|alt=image|486x486px]] | |||
[[File:Db_setup-f0f38f6cd445af32da096c835d2492727b091f3f.png|thumb|none|alt=image]] [[File:Db_setup-B8634fc2985464e926572ac826faa7b4379f3653.png|thumb|none|alt=image]] | |||
Press the blue play icon in the topic bar of icon hieroglyphs and pray. If the schema imported correctly you should have no errors in the message box on the bottom. | Press the blue play icon in the topic bar of icon hieroglyphs and pray. If the schema imported correctly you should have no errors in the message box on the bottom. | ||
[[File:Db_setup-5f7d15719bbacab5f759e2905d421f60c246f95a.png|thumb|none|alt=image|718x718px]] | |||
[[File:Db_setup-5f7d15719bbacab5f759e2905d421f60c246f95a.png|thumb|none|alt=image]] | |||
Create a new user account for the server by going to <code>Tools -> User Manager</code>. | Create a new user account for the server by going to <code>Tools -> User Manager</code>. | ||
* '''Username:''' Anything, but <code>ss13dbuser</code> is the default | * '''Username:''' Anything, but <code>ss13dbuser</code> is the default | ||
* '''Password:''' Any string of random text, you don’t need to remember it, just paste it into your database config. You can randomly generate one by pressing the arrow on the password field. Be sure to copy it. | * '''Password:''' Any string of random text, you don’t need to remember it, just paste it into your database config. You can randomly generate one by pressing the arrow on the password field. Be sure to copy it. | ||
| Line 60: | Line 40: | ||
** <code>INSERT</code> | ** <code>INSERT</code> | ||
** <code>UPDATE</code> | ** <code>UPDATE</code> | ||
[[File:Db_setup-f125cfa6a81217aa0b33ed0431b69c626303a671.png|thumb|none|alt=image|414x414px]] | |||
[[File:Db_setup-f125cfa6a81217aa0b33ed0431b69c626303a671.png|thumb|none|alt=image]] | |||
<span id="update-dbconfig"></span> | <span id="update-dbconfig"></span> | ||
== Update dbconfig == | == Update dbconfig == | ||
Now, on your local copy of the repository, open [[beerepo:blob/master/config/dbconfig.txt|config/dbconfig.txt]] in a text editor. | Now, on your local copy of the repository, open [[beerepo:blob/master/config/dbconfig.txt|config/dbconfig.txt]] in a text editor. | ||
Set the following: | Set the following: | ||
* Uncomment <code>SQL_ENABLED</code> by removing the <code>#</code> in front of it. | * Uncomment <code>SQL_ENABLED</code> by removing the <code>#</code> in front of it. | ||
* <code>ADDRESS 127.0.0.1</code> | * <code>ADDRESS 127.0.0.1</code> | ||
| Line 76: | Line 52: | ||
* <code>FEEDBACK_LOGIN ss13dbuser</code> (or whatever you set) | * <code>FEEDBACK_LOGIN ss13dbuser</code> (or whatever you set) | ||
* <code>FEEDBACK_PASSWORD password</code> (replace with the password you set for the created user) | * <code>FEEDBACK_PASSWORD password</code> (replace with the password you set for the created user) | ||
[[File:Db_setup-dc58b4506df7c115cf8edfa191804ceba96802e5.png|thumb|none|alt=image|653x653px]] | |||
[[File:Db_setup-dc58b4506df7c115cf8edfa191804ceba96802e5.png|thumb|none|alt=image]] | |||
<span id="skip-worktree"></span> | <span id="skip-worktree"></span> | ||
== Skip Worktree == | == Skip Worktree == | ||
Now, on git, this will create tracked changes that you don’t want to commit to any future PRs. So you need to tell git to not process any changes in the file. If you use git command line, this is trivial. | Now, on git, this will create tracked changes that you don’t want to commit to any future PRs. So you need to tell git to not process any changes in the file. If you use git command line, this is trivial. | ||
Run <code>git update-index --skip-worktree config/dbconfig.txt</code>. Git will now ignore changes to this file locally. If you wish to undo this at any point, run <code>git update-index --no-skip-worktree config/dbconfig.txt</code>. | Run <code>git update-index --skip-worktree config/dbconfig.txt</code>. Git will now ignore changes to this file locally. If you wish to undo this at any point, run <code>git update-index --no-skip-worktree config/dbconfig.txt</code>. | ||
[[File:Db_setup-1681618ba8cc443a13696a952af5c720c44a54c3.png|thumb|none|alt=image|743x743px]] | |||
[[File:Db_setup-1681618ba8cc443a13696a952af5c720c44a54c3.png|thumb|none|alt=image]] | |||
If you do not use command line, you should still be able to accomplish this somehow, google the equivalent for whatever tool you use. | If you do not use command line, you should still be able to accomplish this somehow, google the equivalent for whatever tool you use. | ||
= Other database options = | = Other database options = | ||
== Database based banning == | == Database based banning == | ||
Offers temporary jobbans, admin bans, cross-server bans, keeps bans logged even after they've expired or were unbanned, and allows for the use of the off-server ban log. | Offers temporary jobbans, admin bans, cross-server bans, keeps bans logged even after they've expired or were unbanned, and allows for the use of the off-server ban log. | ||
| Line 99: | Line 68: | ||
* Add a # in front of BAN_LEGACY_SYSTEM, so the line looks like "#BAN_LEGACY_SYSTEM" | * Add a # in front of BAN_LEGACY_SYSTEM, so the line looks like "#BAN_LEGACY_SYSTEM" | ||
* Done. Note that any legacy bans are no longer enforced once this is done! So it's a good idea to do it when you're starting up. | * Done. Note that any legacy bans are no longer enforced once this is done! So it's a good idea to do it when you're starting up. | ||
== Database based administration == | == Database based administration == | ||
Offers a changelog for changes done to admins, which increases accountability (adding/removing admins, adding/removing permissions, changing ranks); allows admins with +PERMISSIONS to edit other admins' permissions ingame, meaning they don't need remote desktop access to edit admins; Allows for custom ranks, with permissions not being tied to ranks, offering a better ability for the removal or addition of permissions to certain admins, if they need to be punished, or need extra permissions. Enabling this can be done any time, it's just a bit tedious the first time you do it, if you don't have direct access to the database. | Offers a changelog for changes done to admins, which increases accountability (adding/removing admins, adding/removing permissions, changing ranks); allows admins with +PERMISSIONS to edit other admins' permissions ingame, meaning they don't need remote desktop access to edit admins; Allows for custom ranks, with permissions not being tied to ranks, offering a better ability for the removal or addition of permissions to certain admins, if they need to be punished, or need extra permissions. Enabling this can be done any time, it's just a bit tedious the first time you do it, if you don't have direct access to the database. | ||
Revision as of 21:04, 27 March 2023
Database Setup
When developing, it is useful to have a local database set up, for a variety of reasons.
This guide is a walk through for local testing database installation, however it will work for a production deployment so long as secure passwords are used and firewall settings protect the database from external connection.
Since savefiles no longer store character info, your character and preferences will reset between each startup. This can be problematic in adding a lot of time to the development and testing cycle. As such, it’s useful to set one up. This is a guide on how to do so.
Setup MariaDB (Windows)
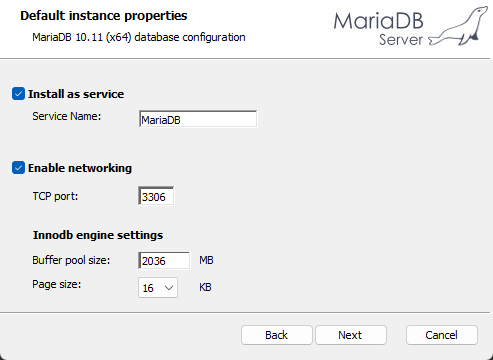
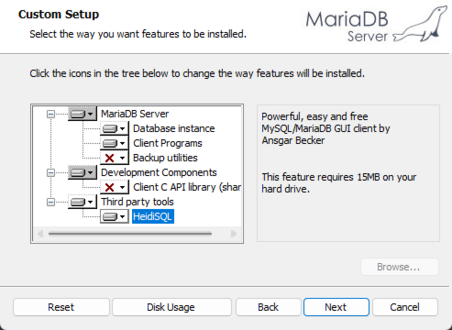
Download and install MariaDB Community Server for your operating system. Be sure to install the following components:
- Database Instance
- Client Programs
- HeidiSQL
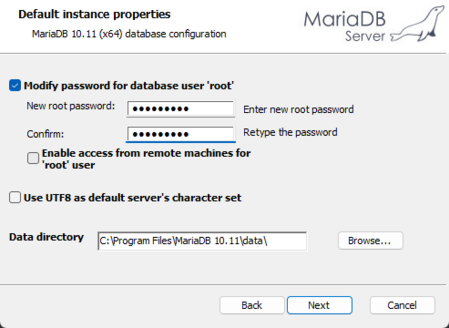
Set a root password, something you will remember. It doesn’t need to be properly secure if it's for local testing, since you won’t be storing anything or hosting it publicly. Do not enable remote access for root.
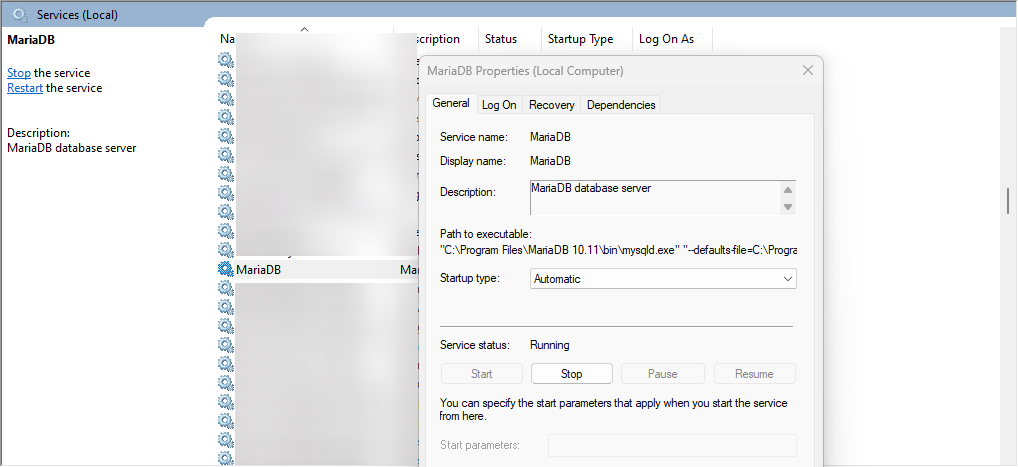
Install it as a service, with networking enabled. The default settings are fine. This means it will run 24/7 in the background. You can manage this in the Windows Services viewer.
Open HeidiSQL, Click on new to create a new session, check prompt for credentials and leave the rest as default.
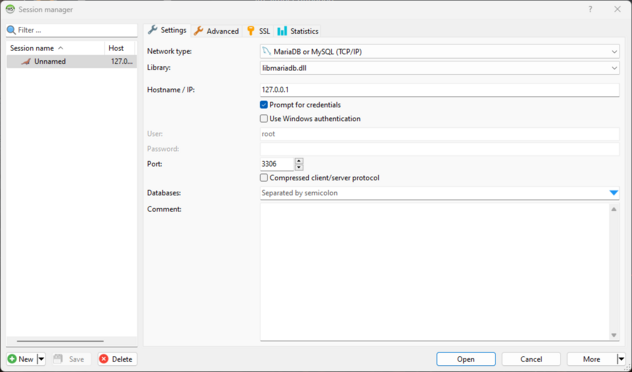
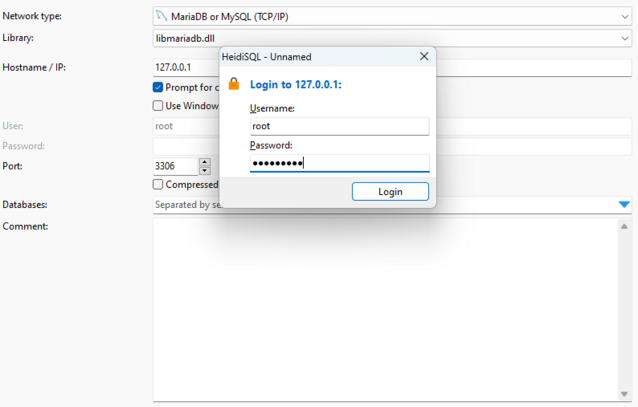
Click save, then click open and enter in root for the username and the password you setup during the installation.
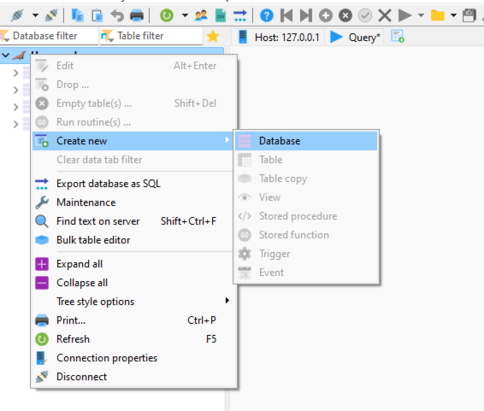
Right click on the server entry in the left side plane (the area with information_schema, mysql, etc) (the server entry will be the first one) and go to Create new -> Database
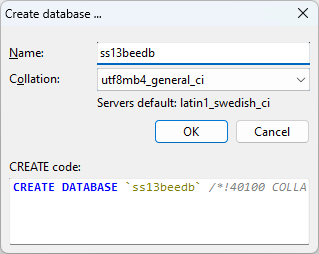
You can name it anything at this step. The default config is ss13beedb, so go ahead and use that. Don’t name it test, or you will have security issues.
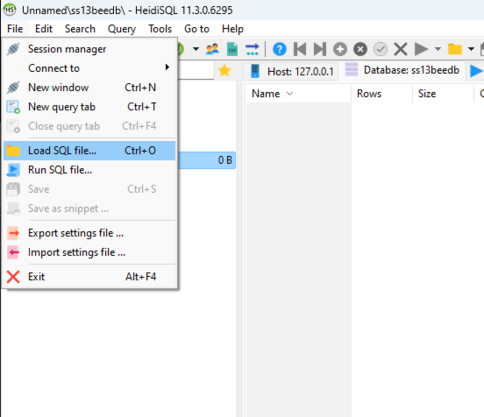
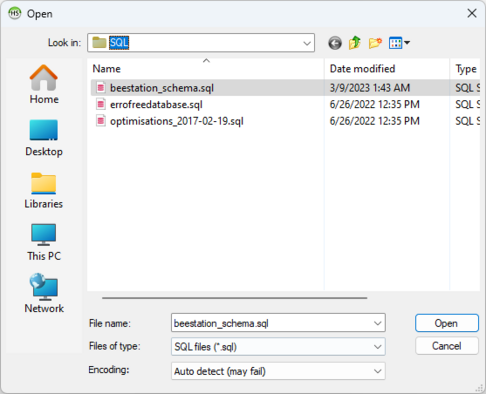
Select the database you just created and then go to File -> Open SQL File and open the file beestation_schema.sql file located at SQL/beestation_schema.sql. You can also find it here, but it may be newer than the version you are using. If it asks you to auto-detect, hit Yes. Ignore any “access violation” errors, the import works anyway.
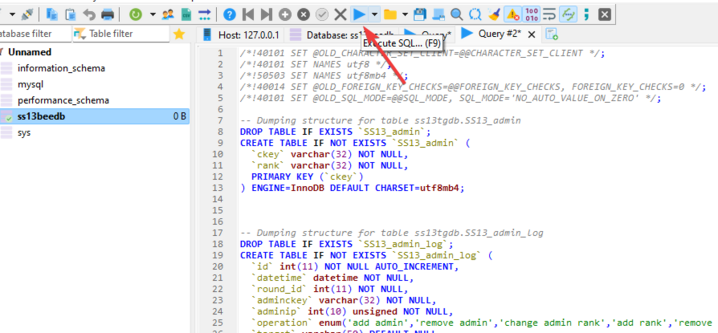
Press the blue play icon in the topic bar of icon hieroglyphs and pray. If the schema imported correctly you should have no errors in the message box on the bottom.
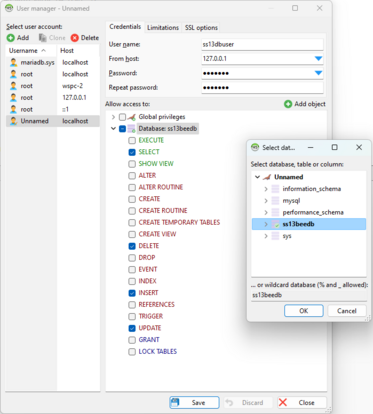
Create a new user account for the server by going to Tools -> User Manager.
- Username: Anything, but
ss13dbuseris the default - Password: Any string of random text, you don’t need to remember it, just paste it into your database config. You can randomly generate one by pressing the arrow on the password field. Be sure to copy it.
- From host:
127.0.0.1 - Permissions: Press “Add object”, select the database you created. Under the new object, add:
SELECTDELETEINSERTUPDATE
Update dbconfig
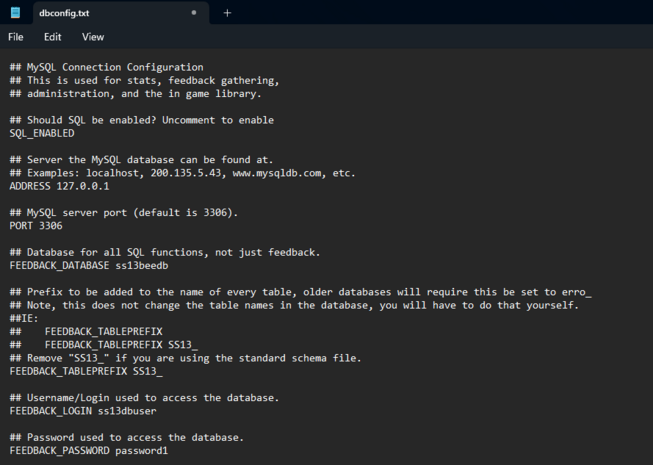
Now, on your local copy of the repository, open config/dbconfig.txt in a text editor.
Set the following:
- Uncomment
SQL_ENABLEDby removing the#in front of it. ADDRESS 127.0.0.1PORT 3306FEEDBACK_DATABASE ss13beedb(or whatever you set)FEEDBACK_LOGIN ss13dbuser(or whatever you set)FEEDBACK_PASSWORD password(replace with the password you set for the created user)
Skip Worktree
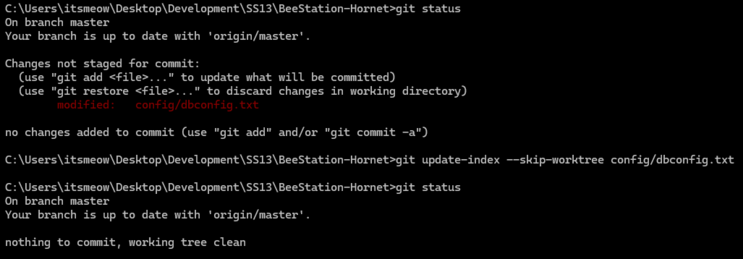
Now, on git, this will create tracked changes that you don’t want to commit to any future PRs. So you need to tell git to not process any changes in the file. If you use git command line, this is trivial.
Run git update-index --skip-worktree config/dbconfig.txt. Git will now ignore changes to this file locally. If you wish to undo this at any point, run git update-index --no-skip-worktree config/dbconfig.txt.
If you do not use command line, you should still be able to accomplish this somehow, google the equivalent for whatever tool you use.
Other database options
Database based banning
Offers temporary jobbans, admin bans, cross-server bans, keeps bans logged even after they've expired or were unbanned, and allows for the use of the off-server ban log.
To enable database based banning:
- Open config/config.txt
- Add a # in front of BAN_LEGACY_SYSTEM, so the line looks like "#BAN_LEGACY_SYSTEM"
- Done. Note that any legacy bans are no longer enforced once this is done! So it's a good idea to do it when you're starting up.
Database based administration
Offers a changelog for changes done to admins, which increases accountability (adding/removing admins, adding/removing permissions, changing ranks); allows admins with +PERMISSIONS to edit other admins' permissions ingame, meaning they don't need remote desktop access to edit admins; Allows for custom ranks, with permissions not being tied to ranks, offering a better ability for the removal or addition of permissions to certain admins, if they need to be punished, or need extra permissions. Enabling this can be done any time, it's just a bit tedious the first time you do it, if you don't have direct access to the database.
To enable database based administration:
- Open config/config.txt
- Add a # in front of ADMIN_LEGACY_SYSTEM, so the line looks like "#ADMIN_LEGACY_SYSTEM"
- Do the steps described in Adding your first admin.
- Done. Note that anyone in admins.txt lost admin status, including you! So do the step above! You can repeat it for everyone, as it's a lot easier to do that and just correct permissions with the ingame panel called 'permissions panel'.
- If your database ever dies, your server will revert to the old admin system, so it is a good idea to have admins.txt and admin_ranks.txt set up with some admins too, just so the loss of the database doesn't completely destroy everything.
If you need more help contact #coderbus.
