Guide to mapping
Other related guides: Understanding SS13 code, SS13 for experienced programmers and Map Merger
Map Merger
It is important that you use the Map Merger tools before commiting any changes to a map. See here for how.
Exploration Ruins
If you want to add space ruins for the exploration team, see Guide to mapping/Exploration ruins.
Important Variables
This section contains a list of important variables and their values which you will need when mapping.
Access Requirements
To set a door to have access requirements you can edit either req_access_txt or req_access_one_txt. Setting req_access_txt to "55,22" for example would require access 55 and 22 for the door to open. Setting req_access_one_txt to "55,22" would mean anyone with access 55 or 22 can open the door and only 1 access is required.
https://wiki.beestation13.com/view/Guide_to_door_access
Disposals Sorting Codes
| Sorting Code | Value |
|---|---|
| Waste | 0 |
| Disposals | 1 |
| Cargo Bay | 2 |
| Quartermaster's Office | 3 |
| Engineering | 4 |
| Chief Engineer's Office | 5 |
| Atmospherics | 6 |
| Security | 7 |
| Head of Security's Office | 8 |
| Medical | 9 |
| Chief Medical Officer's Office | 10 |
| Chemistry | 11 |
| Research | 12 |
| Research Director's Office | 13 |
| Robotics | 14 |
| Head of Personel's Office | 15 |
| Library | 16 |
| Chapel | 17 |
| Theatre | 18 |
| Bar | 19 |
| Kitchen | 20 |
| Hydroponics | 21 |
| Janitor | 22 |
| Genetics | 23 |
| Testing Range | 24 |
| Toxins | 25 |
| Dormitories | 26 |
| Virology | 27 |
| Xenobiology | 28 |
| Law Office | 29 |
| Detective's Office | 30 |
Meta's Guide to Enthusiast Mapping
Written for those with any or no idea of how to use the map-maker.
I have no idea how experienced anyone reading this is, so I'll start from the top and try to assume little. First, you need to get yourself a copy of all the files for editing. To do this, go here and click the ZIP button next to clone this in windows. You won't be able to push to the GitHub repo or anything, but that's complicated and something you can get round to later. Once the .zip downloads, extract it wherever.
So now you have your folder with the latest code in, and a zip backup to go back to if you break everything. In the master folder, you'll see "beestation.dme". You want to open this with Dream Maker a program that'll be in your BYOND folder. Set Dream Maker as the default program for opening .dme files, if it isn't already. When you open it, you'll see a two tabs on the left: file, and object. In the file tab, open maps, and then open 'beestation.2.1.2.dmm', or whatever the current map version is called. You'll then get something looking a bit like this:
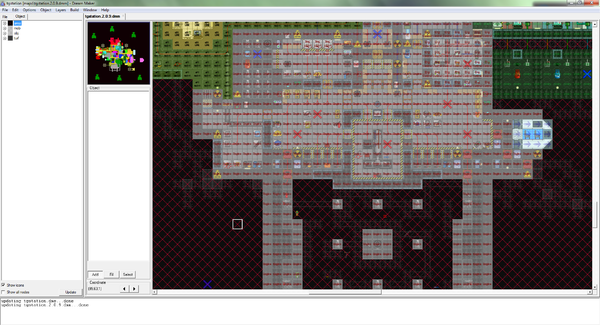
Switch from the files tab to the objects tab, and you'll see area, mob, objects, and turf. These are the four primary 'layers' that you can see in the editor. You can toggle their visibility and interactivity on and off using the layers dropdown. I'd advise copying this map, and renaming it to, say, teststation.dmm. Perhaps delete most or all of the default station, and build on the now-empty z-level, wherever you like. To build stuff, use the object tree on the left of the UI to select things, then click to place them. A simple click lets you place one item per tile from each category, while Ctrl-click stacks it on top of all previous ones and Shift-click deletes the topmost item. You can have multiple maps open at once - I usually have the default beestation map and mine open, and can then shamelessly copy-paste things far more easily. Also, finding stuff in the object tree can be tedious as hell - right click something you see and you can see its path in the tree - obj/structure/closet/etc. This will help you find things. From this point on, really, you can begin mapping proper.
You can select areas to copy/paste/delete, or enter add or fill mode when placing objects. Basically just click around all the menus and you'll work out how they work, more or less. Options>Zoom allows you to zoom out to 50% to see more stuff. Use layers to select which of area, objects and turf you want to edit. If you actually want to be able to see anything, I'd deselect area, and tick 'only show selectable layers'.
The first step, then, is to be able to create your first few rooms. Select a turf (floor) from the generic simulated floors. These will start with the right make-up and pressure of air on them, which is how you'll want it. Surround these floors with walls, and hey presto you have a room. Try sticking some tables in there, perhaps a vending machine or two.
If you want to add some chips to your new den but are unhappy of how they neatly stack on top of eachother, you can change their "pixel_x" and "pixel_y" values in the "edit" rmb-menu to arrange them as you want! (Remember to start and end the value with doublequotes! Also, all custom values are bold so it's easier to identify them.) In fact, most wall-mounted machines on stations are shifted like this, and while they APPEAR to be on a wall, they are actually on the tile in front of it. Just don't go overboard with this, as every new instance of an object is added as its own entry in the menu, and when there are dozens of them it can get hard to remember which one you wanted. Once you've made your room you'll want to put lights in.
Important Note: There are nudge_x and nudge_y variables in the editor, as well as various z-axis variables. Don't ever change these, they're not used in SS13 and break things.
To be able to actually spawn into a room, you'll want to place spawners. You'll see these as the big red X symbols on the default map, for each role. There are also blue Xs for xeno spawn locations and the spawns for all latecomers on the arrival shuttle. Stick in a spawn_late somewhere in your room for now.
To actually play your map and be able to screw around in it as an admin, you'll have to compile it. First, make sure the file tree (on the left like the object tree, click the file tab) is open, and go to maps. Make sure the only one ticked is your own. Then click Build>Compile from the top, and wait for it to finish. This will give you a something like "beestation.dmb" in the folder containing bot, code, config, maps, etc. Whilst here, quickly go into config, and open 'admins.txt'. Replace everything in there with:
"<yourbyondname> = Game Master", filling in your BYOND name.
This will make you an admin, which is very helpful for tinkering ingame. Now to actually boot up a server so you can run your map! Find 'Dream Daemon' (has a big green icon) in your BYOND folder, and click the 'File' dropdown at the bottom. Select your "beestation.dmb". Select a port if you want, put security on safe, and visibility to invisible, for now. Click start to start the server, which will take a little while. You can then connect to it through BYOND by putting in either your external IP, shown in Dream Daemon, if that port is correctly forwarded. Otherwise use your internal IP, 192.168.x.x, where x is whatever. If you don't know this, ask and I can help. Once in, go to the admin tab and click 'start game'. By joining after the start, you'll spawn at the late spawn you made, and, being an admin, will be able to make stuff, delete stuff, and other handy admin things (like causing massive explosions).
From there on, you can make whatever you like, really. Copying the default map and working out how everything works isn't too hard and is fairly rewarding. You could just tweak the default one for a bit if you like. The first thing I made was a small shuttle - you can see this at the bottom. Just tweak it and add stuff and you'll work out how almost everything works fairly easily. For explanations of wiring, piping, and atmos, ask away on here. I'll add an atmos guide later on, as well as a power generation and wiring guide. If you're a good engineer in-game, it'll help a lot as a mapper.
If you've managed to get all the way to the end of this before I've added more, fine effort on your part. Have fun screwing around with stuff, and feel free to ask anything you like. I'll add more stuff here soon.
Pre-commit checks
- Are floors with or without air, as they should be? (regular or airless)
- Does the area have an APC?
- Does the area have an Air Alarm?
- Does the area have a Request Console?
- Does the area have lights?
- Does the area have a light switch?
- Does the area have enough intercoms?
- Does the area have enough security cameras? (Use the verbs under Mapping for help)
- Is the area connected to the scrubbers air loop?
- Is the area connected to the vent air loop? (vent pumps)
- Is everything wired properly?
- Does the area have a fire alarm and firedoors?
- Do all pod doors work properly?
- Are accesses set properly on doors, pod buttons, etc.
- Are all items placed properly? (not below vents, scrubbers, tables)
- Does the disposal system work properly from all the disposal units in this room and all the units, the pipes of which pass through this room?
- Check for any misplaced or stacked piece of pipe (air and disposal)
- Check for any misplaced or stacked piece of wire
- Identify how hard it is to break into the area and where the weak points are, and balance the area accordingly (eg. the Vault should be made of reinforced structures and electrified windows, the Kitchen should not)
- Check if the area has too much empty space. If so, make it smaller and replace the rest with maintenance tunnels
- Are there any indestructible turfs where they shouldn't be?
General Station-wide Mapping Guidelines
In general
- Don't run pipes/cables/disposals through walls if you can avoid it. Otherwise it's a pain to repair or sabotage them, especially under r-walls.
- Try to connect departments to maintenance through a back or side door. This lets players escape and allows antags to break in. Metastation is a good example for this.
Atmospherics
- Each area should have EXACTLY one air alarm (Exceptions are only possible if a room has scrubbers or vent pumps on different frequencies).
- Each ROOM (Walled off space) should have at least one vent pump and scrubber, which is properly connected to its respective loop.
Keep in mind that scrubbers don't detect gases/pressure; only air alarms do. - The air supply loop's pipes should be colored blue.
- The scrubbers loop's pipes should be colored red.
- Some areas require special air alarm subtypes: /engine for the SME and /server for tcomms or the RnD server room.
Power
- Each area (which requires power) should have exactly one APC. For areas with a high roundstart power draw (engineering/cargo), one of the highcap subtypes can be used.
Atmospherics
Pipes and manifolds
Atmospherics releases it's cocktail of gases into the air supply loop (blue pipes). The station is also equipped with a scrubber loop, which filters unwanted gases and sends them back to atmospherics via the scrubber loop (red pipes).
If you're expanding the air supply loop (blue pipes) use the objects in /obj/machinery/atmospherics/pipe/simple/supply/visible or ../hidden depending on if you want it to show above floors or below them. For manifolds use the objects in /obj/machinery/atmospherics/pipe/manifold/supply/visible and ../hidden.
If you are expanding the scrubber loop (red pipes) use the objects in /obj/machinery/atmospherics/pipe/simple/scrubbers/visible or ../hidden depending on if you want it to show above floors or below them. For manifolds use the objects in /obj/machinery/atmospherics/pipe/manifold/scrubbers/visible and ../hidden.
If you are however building a pipe network which has nothing to do with the air supply or scrubbers loop, you should use the objects in /obj/machinery/atmospherics/pipe/simple/general/visible or ../hidden. For manifolds use the objects in /obj/machinery/atmospherics/pipe/manifold/general/visible and ../hidden.
To add new colors of pipes, you will need add a new subtypes in the appropriate .dm files located in beestation\code\modules\atmospherics\machinery\pipes
Please refrain from var-editing pipes, as it typically introduces graphical glitches and other issues.
Air Alarm
Every single area (with scrubbers and/or vent pumps) should have exactly one air alarm. More than one should be placed if vent pumps or scrubbers use different radio frequencies than the default one (1439).
Scrubbers (Station air supply)
Every room (ie. walled off space) except for maintenance hallways should have at least one scrubber.
The path for scrubbers that start on is /obj/machinery/atmospherics/components/unary/vent_scrubber/on
And make sure the id_tag is the default one (null)
Also ensure the scrubber is connected to the scrubber loop!!
Vent Pumps (Station air supply)
Every room (ie. walled off space) except for maintenance hallways should have at least one vent pump.
The path for vents that start on is /obj/machinery/atmospherics/components/unary/vent_pump/on
Please make sure the id_tag is the default one (null)
Also ensure the vent pump is connected to the air supply loop!!
Gas tanks and filters
Each station should have a full set of these - or at the bare minimum, one for N2, one for O2 and a third tank to filter dangerous gases into.
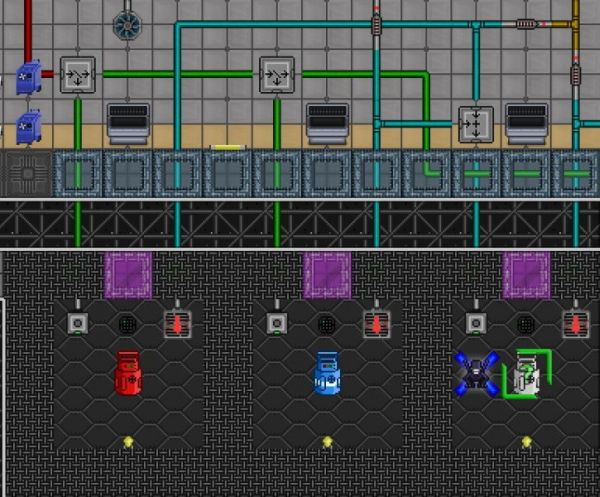
Each gas tank needs:
- Outside: A tank computer and a gas filter to pick what gases will be filtered into it.
- Inside: A gas injector (input), a vent pump (output), a gas sensor and a specific turf.
The tank computer controls the input/output and receives data from the gas sensor.
The specific turf creates the gases that will be inside each tank - the gas canister is just for decoration.
Let's take a look at the MetaStation N2 tank:
- Tank computer: /obj/machinery/computer/atmos_control/tank/nitrogen_tank
- N2 filter: /obj/machinery/atmospherics/components/trinary/filter/atmos/n2
- Gas injector: /obj/machinery/atmospherics/components/unary/outlet_injector/atmos/nitrogen_input
- Vent pump: /obj/machinery/atmospherics/components/unary/vent_pump/siphon/atmos/nitrogen_output
- Gas sensor: /obj/machinery/air_sensor/atmos/nitrogen_tank
- Turf: /turf/open/floor/engine/n2
These objects have all the neccessary vars preset and start switched on - you'll only have to edit the dir if neccessary.
Additionally, you'll want this type of gas mixer for the airmix tank (N2 + O2):
- Air mixer: /obj/machinery/atmospherics/components/trinary/mixer/airmix
Power
APC
Each new room needs at least one, this will provide all the power for the room (magically). Each piece of machinery inside the APC's area will draw power from either the lighting, equipment or environmental channel.
Any room that is very equipment heavy (for example cargo bay) may need a beefed up APC (apc/highcap) to prevent early blackouts. These start with higher capacity power cells.
Wiring
Make sure the wires lead from the main power grid, and to the APC(s) of your area. If any equipment in your new area requires a wire under it, line it up, connected to the main power grid, and under the machinery.
Wires are also helpful when making electrical grilles (just dot wire under a grille), make sure the wires touch the main power grid (or they won't shock people).
Equipment
Lights
Lights take up a lot of power, don't use too many! Make sure to put in just enough so the room is fully lit, but not so many that the equipment will go out in ten minutes of the round starting.
Light switch
For mood lighting, or to show the room is currently not in use by the primary occupant. These disable the lighting equipment (and power drain associated) in the area, but not desk lamps. Place these on walls, usually by a door.
Request Console
If a certain room has no need for materials, or produces no materials, do not give it a Request Console. If it does (for either case or both) make sure it has at least one, that is in a place where some one will see it.
Intercoms
At least every room should have one of these. They should be set to 145.9, and be speaker ON Microphone OFF. This is so radio signals can reach people even without head sets on. Larger room will require more than one at a time.
Security Cameras
Most areas should have these, enough to see the general area from a Human point of view, but, not bunched together for the AI's sake. Larger rooms may require more than one.
Room Structure
Access
Access to doors is handled by req_access values. There are four when editing a door - req_access, req_access_txt, req_one_access, and req_one_access_txt. The one's we're concerned with are req_access_txt and req_one_access_txt.
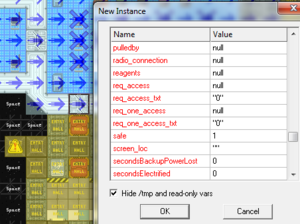
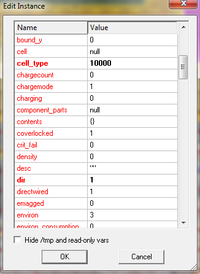
This image shows a door on the Arrivals shuttle - since it's a public door, the access is set to "0", as everyone should be able to open it. If we look at the Brig front door, we would set the access to 63, because that's the value for Security front doors - accessible by Security positions, but no one else.
Multiple accesses to doors are handled by adding a semicolon (with no spaces) between access values (eg. "28;31" is for Kitchen and Cargo access). This might seem worthless, but it's useful for small maps, where jobs might need to share access due to cramped spaces.
There's an important difference between the two that you need to pay attention to - req_access_txt requires ALL LISTED ACCESSES to open the door, while req_one_access_txt lets anyone with ONE OF THE LISTED ACCESSES open the door. For example - say you want your Brig to be openable by the Detective and Security Officers, we would put "63;4" in req_one_access_txt, because we want the Detective AND Security to have access. If we used req_access_txt, you would need BOTH accesses to open the door, meaning neither the Detective or Security could open it.
You can view all of the access values in the code/game/jobs/access.dm file. (Most should be self explanatory or have a label, but if you really aren't sure, you can take a look at Boxstation's map file and check the value on the door you're looking for).
Airless Floors
Ideal for rooms or chambers that mix gas, and for tiles exposed to space. Not ideal for areas that humans will cross in frequency.
Use these on external tiles (to prevent lag when the game starts) and chambers that will require gas mixing (toxins mix chamber/ furnace). Double check these to make sure you don't suffocate mobs in the new rooms.
Fire Alarms and Fire Doors
Make sure to put these INSIDE of the boundary of the area, so there is a lock down. Any spot that gets hot as a normal function should not have a fire Alarm right next to the heat source (toxin mix chamber). Make sure there is a fully sealed area (with the exception of maintenance doors for people to escape fires) that can't be open by normal civilians.
Weak Points
Judge how high security the room will be, if it is high security, reinforced walls and electrified grill windows may be in order. Areas that do not need a lot of security can use basic walls, and windows to your liking (though normal glass windows break very very easy). Each room should have one place that's weaker than the rest (like a back door, side entrance, or a window), just because the main entrance might be out of commission (and realistically, for traitors to break into).
Item and Machinery Distribution
Be smart about what will go in an area, keep a fine balance between the size of the room and amount of equipment. Large rooms may require multiple APCs to prevent power outages early in game. Second, make sure to place equipment that make sense for the area (security computer in a security area/ Medical vendor in a medical area).
Indestructible Turfs
Before you finalize a map, check for any indestructible turfs. These turfs ignore things like external damage and are typically meant for things like special ruins/rooms where you want to avoid people trying to circumvent a path. Due to these characteristics, they have no real place on regular station maps and would probably lead to confusion for players more than anything.
Balance
Item contents
The harder the room is to enter, the more goodies or sensitive equipment there is inside. Make sure to keep this in mind (and don't make an empty room that's covered in blast doors, electrified grills, reinforced walls, and captain level doors).
Room security
A room is only as secure as its necessity. Public rooms should not have many security functions (other than a fire alarm), but private work space must be more secure (based on job). The bartenders do not need reinforced walls around their storage, but engineers do.
The highest security rooms should utilize the highest security measures. The lowest security rooms should utilize the cheapest security measures.
Step_x, step_y and the broken movement syndrome
So you compiled the map and suddenly whenever you move you no longer get the animation of moving but just 'appear' on the next tile?
So a while back step_x and step_y were introduced to allow pixel based movement. SS13 does not utilize this. Step_x and step_y are variables that each atom has. The way they work is that as soon as you set any object on the map to use one of these variables, the game interprets that you overrode all default movement code and wrote your own - but you didn't (The code that makes the animation from tile to tile).
To fix this problem you need to close dream maker (save the project first, obviously). Open your map (.dmm) file in a text editor, such as notepad or notepad++. Search (ctrl+f) through the file for step_x and step_y and remove any reference to it. Once no more step_x or step_y -es are found in the file, save it and open it in dream maker once again. Compile the code and movement should work fine once more. Go to the development IRC if you need more help.
Shuttles
Basically there's 3 types of shuttle dock stationary, transit and mobile
- stationary == places where the shuttle can dock
- transit == shuttle as it moves
- mobile == the place with the actual shuttle
so you'd have a transit dock in the transit area and 2 stationary docks, one in centcomm and the other one in the station and 1 mobile dock, in centcomm for most shuttles (apart from mining)
The shuttle docks are grouped by id eg id = "cargo_away" id = "cargo_transit"
You need to add the dock types to the map and edit the bounding boxes via varediting the dock, you need to varedit height, width, dheight and dwidth at minimum. These are offset by the dir so do keep that in mind, eg if dir == 2 then width goes from EAST to WEST, if dir == 4 then width goes from NORTH to SOUTH and dwidth/dheight are offsets from the lower-left corner of the plane switched to the dock's dir
You should also ensure the directions face the shuttle or face away from the thing the shuttle docks with.
If a shuttle's mobile docking port direction is different then the stationary docking port's direction, the shuttle and all items on it will be rotated accordingly. (Try it, it works properly for just about everything)
Warning the bounding box for the mobile dock must fit inside of the stationary dock (after any rotation) Or the shuttle will refuse to move.
If the shuttle's mobile docking port is in an area that is a subtype of /area/shuttle, Only turfs in the bounding box in that same area are moved. Otherwise it moves all turfs in the bounding box. This can be used for odd shaped shuttles. (the area will be transfer over as well)
Also note that the emergency shuttle and cargo shuttle need special subtypes of the dock type eg so /obj/docking_port/mobile/emergency
The other variables of note is traveldir, which defines if the shuttle rotates on transit, it's an angle in degrees (just imagine the shuttle is inside a circle . For example, if you want the shuttle going right to left set it to 270 degrees.
Dwidth and Dheight in more depth
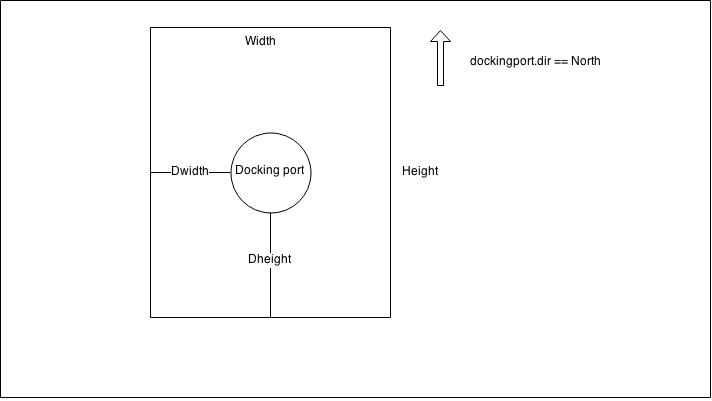
dwidth/dheight is the offset of the docking_port obj from the (0,0) bounding box corner. In dir == 1 (north) 0,0 is the bottom left corner? This changes for each direction, For example when dir is 2 it's the upper right corner. so dwidth and dheight identify where the bounding box starts relative to the docking port obj whereaswidth and height determine the actual width and height of the bounding box
Note: We count step 0 as a tile, so a height and width of 9 is actually 10 tiles (tile 0 to tile 9)
Here is an example for the north facing shuttle dock direction - you can rotate this image to determine where the offset is for each other cardinal direction
Other files
If you are adding a map to the game, you need to ensure it has a JSON file under _maps, and is included in the maps config file.
Contribution guides
| |
| General | Development, Downloading the source code / hosting a server, Guide to git, Game resources category, Guide to changelogs |
| Database (MySQL) | Setting up the database, MySQL |
| Coding | Understanding SS13 code, SS13 for experienced programmers, Binary flags, Text Formatting, Guide to signals |
| Mapping | Guide to mapping, Map merger, Exploration Ruins |
| Spriting | Guide to spriting |
| Wiki | Guide to contributing to the wiki, Wikicode |
