Guide to git: Difference between revisions
imported>Jordie0608 (Added links to coderbus and Erro's video guide) |
Itsmeowdev (talk | contribs) (Fix GitKraken grammar) |
||
| (43 intermediate revisions by 18 users not shown) | |||
| Line 1: | Line 1: | ||
== | = Git Command Line = | ||
Many are drawn to GUI versions of Git, such as GitHub Desktop, GitKraken, and VSCode’s Git integration. However, I believe this is more of a hindrance than a help. If you’re just making mapping or sprite PRs, sure, maybe you can get along just fine with GitHub Desktop. However, these tools lack the expansive features of the command line and are harder to get help with. Command line is far more google-able if you have problems and I highly recommend it. Far more people will be able to assist you if you are using command line than an GUI tool. | |||
== | <span id="the-setup"></span> | ||
== The Setup == | |||
Download and install [[git:|git-scm]]. You should probably set it up to use the shell of your choice (I use command line on Windows Terminal), or if you prefer Git Bash, use that. Do note that installing it to your system PATH is very useful if you want to use VSCode’s builtin terminal. | |||
Also be sure to set your name/email in your git client so your commits show properly and are attributed properly. | |||
<code>git config --global user.name "Name Here"</code> <code>git config --global user.email "email here"</code> | |||
Often times the default can expose personal information. So be ''sure'' to set this. | |||
Name can just be your GitHub username or something else, doesn’t matter. | |||
As long as the email you put is added to your GitHub account it will work fine and show your icon on commits. GitHub will also provide you with a private email, if you don't have any type of "business" email, it is recommended to use this. | |||
For more details on commit email privacy, read [https://docs.github.com/en/account-and-profile/setting-up-and-managing-your-personal-account-on-github/managing-email-preferences/setting-your-commit-email-address GitHub's guide]. | |||
<span id="git-terms-cheat-sheet"></span> | |||
== Git Terms Cheat-Sheet == | |||
'''HEAD:''' Term for the current location on the “commit tree”, basically your current location in history. | |||
'''Detached HEAD:''' A state the client can be in, where the history is at a specific point in time, but not attached to a branch. Committing changes is not possible unless the HEAD is re-attached by checking out a branch. | |||
'''Staging:''' an in-between state of your local filesystem and a commit. This is so you can have some changes locally but not commit all of them. | |||
'''Commit:''' a collection of changes, applied as a “patch” onto the previous (parent) commit. Think of it as a chain link that contains a snapshot of the repository at that time | |||
'''Branch:''' A collection of commits in one big chain, that can split off at any time | |||
'''Merge:''' Joining two branches | |||
'''Remote:''' A secondary git repository to sync changes with, usually GitHub but can be any server that supports the protocol | |||
'''Upstream:''' The remote that you are pulling from/pushing to, in that case your fork OR the main beestation repo | |||
<span id="git-commands-cheat-sheet"></span> | |||
== Git Commands Cheat-Sheet == | |||
<code>git clone (github link)</code> downloads the linked repository into a folder at the current location. | |||
<code>git pull remotename branchname</code> runs <code>git fetch remotename</code> and then <code>git merge remotename/branchname</code> | |||
<code>git fetch remotename</code> gets all the new commits from remote | |||
== | <span id="merging-strategies"></span> | ||
=== Merging Strategies === | |||
<code>git merge branchname</code> Attempts to merge all new commits from branchname into the current HEAD, through a few strategies that vary: | |||
* Fast-forward - Simple, used when the new changes are directly on top of, as in, have a continous history rooting from the current HEAD. For example, if someone pushed one commit to origin/master, and your local master didn’t have this one commit, it can simply be “fast forwarded” and add the new commit on the end | |||
* Recursive: the normal strategy, it tries to put both the local changes AND the remote changes into one branch by adding the commits in what is called a “merge commit” | |||
* Rebase: this is its own command, <code>git rebase branchname</code> This attempts to take all of your LOCAL changes, and then append them to the end of the REMOTE branch, rather than putting the remote branch into your current one. This is personally my favorite for PRs because it makes a clean commit history, but it also “rewrites” all your commits into new ones, so it’s not suitable for branches used by multiple people because it doesn’t maintain the commit tree | |||
<code>git reset commitsha (or branchname)</code> - Sets the current HEAD to the commit listed OR the branchname listed. If you specify –hard, it will update the local filesystem to match this, if you don’t specify or put –soft, it only updates this in git, keeping your file changes intact | |||
<code>git checkout commitsha (or branchname)</code> - For commits, this will “rewind” you to that commit and also “detaches HEAD”, which basically means you are no longer on a branch and can’t commit stuff. A temporary rewind, essentially. When you check out a branch, it’s basically just moving you to that branch. Do this for new PRs etc. | |||
<code>git branch (branchname)</code> creates a new branch with the current commit history of the branch you are on | |||
<code>git branch -d (branchname)</code> deletes branch with said name | |||
<code>git add (filepath)</code> adds the file to “staging” | |||
<code>git restore --staged (filepath)</code> removes the file from “staging” | |||
<code>git status</code> View what is staged, what is not, also view what branch/commit you are on. VERY useful. | |||
<code>git add .</code> Add ALL local filesystem changes to staging | |||
<code>git checkout -- .</code> Undo all local changes, get rid of them | |||
<code>git checkout HEAD .</code> The same as above but stricter, if it doesn’t work | |||
<code>git checkout HEAD (or --) filepath</code> resets that file to the last commit on your filesystem | |||
<code>git commit -m "Commit message"</code> creates a commit with the current staged changes and adds it to the branch | |||
<code>git push remotename branchname</code> pushes the current local branch to remotename/branchname | |||
<code>git remote add (remotename) (github link)</code> creates a remotename with a github repo so you can push/pull from it | |||
<code>git push -u remotename branchname</code> OR <code>git pull --set-upstream remotename branchname</code> sets the route from your CURRENT local branch to a remote branch. This makes it so you can just type <code>git push</code> or <code>git pull</code> without having to specify the remote or branch. | |||
<code>git reset HEAD~(number)</code> resets current HEAD X commits backwards in the commit history | |||
<code>git checkout HEAD~(number)</code> temporarily rewinds and detaches HEAD X commits back in history | |||
<code>git log</code> show the commit history (q to exit) | |||
<code>git diff HEAD</code> show all the changes you have made locally that are not committed (q to exit) | |||
<span id="merge-conflicts"></span> | |||
== Merge Conflicts == | |||
Merge conflicts can look intimidating, but they aren’t in reality (unless you don’t know how to code). | |||
When two commits change the same part of the same file, git tries to merge them, but can’t, since it would probably break the code if it guessed. | |||
Instead, it lets you do it yourself. | |||
It writes into the file what looks like this | |||
<pre><<<<<<<<<<<<<<<<<< HEAD | |||
(version before merge) | |||
================= | |||
(new version) | |||
>>>>>>>>>>>>>>>>>> commitsha</pre> | |||
It usually does that multiple times per file. Basically compare the two, remove the markers and write the file back how it should be if both were merged into one. | |||
Here is an example. | |||
<pre>/proc/main() | |||
var/the_variable = GLOB.the_var | |||
<<<<<<<<<<<<<<<<<< HEAD | |||
if(variable?.test()) | |||
================= | |||
if(the_variable.test() | |||
>>>>>>>>>>>>>>>>>> commitsha | |||
do_something()</pre> | |||
This would most likely be merged into this: | |||
<pre>/proc/main() | |||
var/the_variable = GLOB.the_var | |||
if(the_variable?.test() | |||
do_something()</pre> | |||
The inferred history here is the variable was named <code>variable</code>, and the current branch changed it to <code>the_variable</code>. However, another branch added the <code>?.</code> operator to the proccall. When this change was merged in, Git noticed an unexpected change to the variable name and placed a merge conflict. Making sense now? The way to merge it is applying both changes as intended. | |||
<span id="mapping-conflicts"></span> | |||
=== Mapping Conflicts === | |||
DMM files are impossible to merge via text, so we have tooling in the repository to automatically merge them. | |||
Run <code>tools/mapmerge2/Resolve Map Conflicts</code> | |||
If there are any conflicting tiles, you will be prompted to fix it in your map editor, then you can continue by committing the changes. | |||
For more info, see [[Map Merger]]. | |||
=== Icon Conflicts === | |||
DMI files contain multiple images, making merge conflicts ''always'' happen if the file is updated by two branches. This means solving them is relatively trivial but can be time consuming. So there’s a tool for it. | |||
Run <code>tools/dmi/Resolve Icon Conflicts</code> | |||
<span id="automatic-merge-conflict-resolution"></span> | |||
=== Automatic Merge Conflict Resolution === | |||
Also, perk of using command line, if you want git to '''AUTO MERGE DMI and DMM''', as well as auto-cleanup your maps on commit, just run <code>tools/hooks/Install</code>. No need to run them manually anymore, they will run automatically if you merge or commit. | |||
<span id="making-a-basic-pr-with-command-line"></span> | |||
== Making a basic PR with command line == | |||
First, you’ll need to clone the repository: | |||
<code>git clone <nowiki>https://github.com/BeeStation/BeeStation-Hornet/</nowiki></code> | |||
Then, change directories into the repository with <code>cd</code>. | |||
You will now need to create a branch for your changes, using the master branch for PRs is bad practice. | |||
<code>git branch my-pr-that-does-something</code> | |||
Now the branch is created, but you need to “check it out”, or switch to it: | |||
<code>git checkout my-pr-that-does-something</code> | |||
Make any changes in VSCode. When you’re done, run: | |||
<code>git status</code> | |||
Notice what files now have “unstaged changes”. Any files you do NOT want changes in, run | |||
<code>git checkout HEAD (filepath)</code> | |||
This will delete unwanted changes on your local filesystem. | |||
Any files you DO want to PR changes to, run | |||
<code>git add (filepath)</code>, or if you want to add all files, use <code>.</code> as the filepath. | |||
Now run <code>git status</code>, and confirm all the changes you want are staged. | |||
Now you’re ready to commit. Run: | |||
<code>git commit -m "Put a summary of your changes here"</code> | |||
This will create a commit and add it to the current branch. Run <code>git log</code> to see the commit history. You can exit with <code>q</code> and navigate with arrows. | |||
That worked, so now you just need to push the changes to your fork of the repository. So go on GitHub and press the fork button on the top right of BeeStation-Hornet, and you’ll be taken to your new fork repository. You need to add this as a remote on your local client. | |||
<code>git remote add fork <nowiki>https://github.com/(your</nowiki> GitHub username)/BeeStation-Hornet/</code> (change this to your fork’s link) | |||
Then, you can push to a branch on your fork. | |||
<code>git push -u fork my-pr-that-does-something</code> - The <code>-u</code> here tells Git to save that this is the path to remote. This means that when you run <code>git push</code> without passing a remote or branchname, it will know where to push the next time. The same applies to <code>git pull</code>. | |||
Done! Now go to your fork on GitHub and refresh, you’ll see something like “changes have recently been pushed to branch my-pr-that-does-something” with a big “Open pull request” button. Press that and make sure it’s going to the main repository. You can also do this manually from the Pull Requests tab on your fork. | |||
=GitKraken= | |||
==How to update your branch from master== | |||
{| class="wikitable" | |||
|+ | |||
!images | |||
! width="400px" | instruction | |||
|- | |||
|[[File:Gitkrakenpage1.png|frameless|500x500px|center]] | |||
| | |||
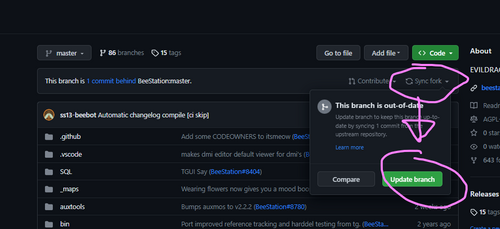
* Go to your master branch (on GitHub), and sync it to up-to-date | |||
|- | |||
|[[File:Gitkraken-updateyourmaster.png|center|frameless|400x400px]] | |||
| | |||
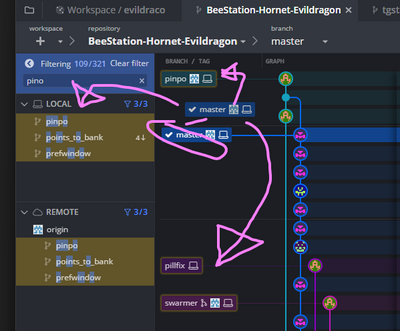
* Pull your master (local) from your master (remote GitHub) | |||
|- | |||
|[[File:Gitkraken-dragyourmaster.png|center|frameless|400x400px]] | |||
| | |||
* Drag your master onto a branch where you need to update | |||
|- | |||
|[[File:Gitkrakenmerge2.png|center|frameless|444x444px]] | |||
| | |||
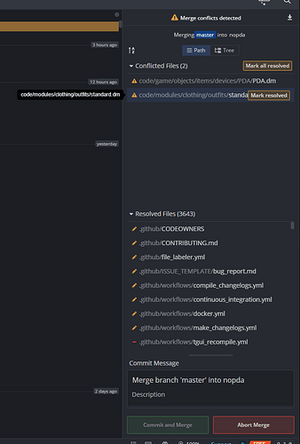
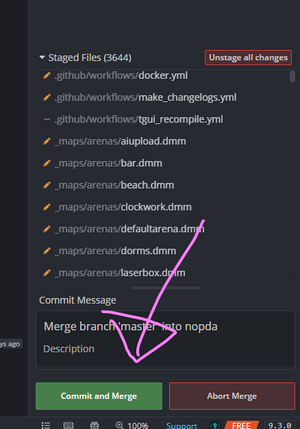
* if it’s not compatible, a merge-conflict will occur. Click the file in the issue. It’s not <code>"Mark resolved"</code>. | |||
|- | |||
|[[File:Gitkrakenconflictslist.png|center|frameless|500x500px]] | |||
| | |||
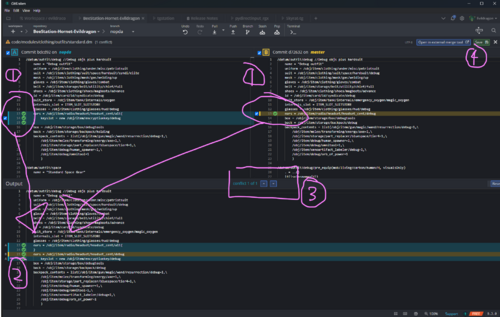
* (1): click these lines, then it will be the bottom window (2). clicking a line will transfer only one line. clicking a check-box will transfer the whole lines. (the example clicked different lines to let you recognise it’s possible to put different lines, but you won’t really do that in this way. There’s no reason to transfer lines like this) | |||
<blockquote>NOTE: | |||
My suggestion for handling this is to transfer all lines from both of these, and compare how the new logic is different. | |||
in this image, the conflict is only 3 lines, so just transferring a single line would be enough, but when it’s massive, comparing all lines is important.</blockquote> | |||
* (2): the result of your merge-confliction resolve. | |||
* (3): The list of where merge-confliction occurs. | |||
* (4): click this once it’s done | |||
click (4) once the merge resolve is done. | |||
|- | |||
|[[File:Gitkrakenmerge.png|center|frameless|429x429px]] | |||
|Now commit your changes. | |||
|} | |||
Q. How can I resolve the map conflicts? | |||
A. See [[Map Merger]] | |||
{{Contribution guides}} | {{Contribution guides}} | ||
Latest revision as of 06:23, 16 April 2023
Git Command Line
Many are drawn to GUI versions of Git, such as GitHub Desktop, GitKraken, and VSCode’s Git integration. However, I believe this is more of a hindrance than a help. If you’re just making mapping or sprite PRs, sure, maybe you can get along just fine with GitHub Desktop. However, these tools lack the expansive features of the command line and are harder to get help with. Command line is far more google-able if you have problems and I highly recommend it. Far more people will be able to assist you if you are using command line than an GUI tool.
The Setup
Download and install git-scm. You should probably set it up to use the shell of your choice (I use command line on Windows Terminal), or if you prefer Git Bash, use that. Do note that installing it to your system PATH is very useful if you want to use VSCode’s builtin terminal.
Also be sure to set your name/email in your git client so your commits show properly and are attributed properly.
git config --global user.name "Name Here" git config --global user.email "email here"
Often times the default can expose personal information. So be sure to set this.
Name can just be your GitHub username or something else, doesn’t matter.
As long as the email you put is added to your GitHub account it will work fine and show your icon on commits. GitHub will also provide you with a private email, if you don't have any type of "business" email, it is recommended to use this.
For more details on commit email privacy, read GitHub's guide.
Git Terms Cheat-Sheet
HEAD: Term for the current location on the “commit tree”, basically your current location in history.
Detached HEAD: A state the client can be in, where the history is at a specific point in time, but not attached to a branch. Committing changes is not possible unless the HEAD is re-attached by checking out a branch.
Staging: an in-between state of your local filesystem and a commit. This is so you can have some changes locally but not commit all of them.
Commit: a collection of changes, applied as a “patch” onto the previous (parent) commit. Think of it as a chain link that contains a snapshot of the repository at that time
Branch: A collection of commits in one big chain, that can split off at any time
Merge: Joining two branches
Remote: A secondary git repository to sync changes with, usually GitHub but can be any server that supports the protocol
Upstream: The remote that you are pulling from/pushing to, in that case your fork OR the main beestation repo
Git Commands Cheat-Sheet
git clone (github link) downloads the linked repository into a folder at the current location.
git pull remotename branchname runs git fetch remotename and then git merge remotename/branchname
git fetch remotename gets all the new commits from remote
Merging Strategies
git merge branchname Attempts to merge all new commits from branchname into the current HEAD, through a few strategies that vary:
- Fast-forward - Simple, used when the new changes are directly on top of, as in, have a continous history rooting from the current HEAD. For example, if someone pushed one commit to origin/master, and your local master didn’t have this one commit, it can simply be “fast forwarded” and add the new commit on the end
- Recursive: the normal strategy, it tries to put both the local changes AND the remote changes into one branch by adding the commits in what is called a “merge commit”
- Rebase: this is its own command,
git rebase branchnameThis attempts to take all of your LOCAL changes, and then append them to the end of the REMOTE branch, rather than putting the remote branch into your current one. This is personally my favorite for PRs because it makes a clean commit history, but it also “rewrites” all your commits into new ones, so it’s not suitable for branches used by multiple people because it doesn’t maintain the commit tree
git reset commitsha (or branchname) - Sets the current HEAD to the commit listed OR the branchname listed. If you specify –hard, it will update the local filesystem to match this, if you don’t specify or put –soft, it only updates this in git, keeping your file changes intact
git checkout commitsha (or branchname) - For commits, this will “rewind” you to that commit and also “detaches HEAD”, which basically means you are no longer on a branch and can’t commit stuff. A temporary rewind, essentially. When you check out a branch, it’s basically just moving you to that branch. Do this for new PRs etc.
git branch (branchname) creates a new branch with the current commit history of the branch you are on
git branch -d (branchname) deletes branch with said name
git add (filepath) adds the file to “staging”
git restore --staged (filepath) removes the file from “staging”
git status View what is staged, what is not, also view what branch/commit you are on. VERY useful.
git add . Add ALL local filesystem changes to staging
git checkout -- . Undo all local changes, get rid of them
git checkout HEAD . The same as above but stricter, if it doesn’t work
git checkout HEAD (or --) filepath resets that file to the last commit on your filesystem
git commit -m "Commit message" creates a commit with the current staged changes and adds it to the branch
git push remotename branchname pushes the current local branch to remotename/branchname
git remote add (remotename) (github link) creates a remotename with a github repo so you can push/pull from it
git push -u remotename branchname OR git pull --set-upstream remotename branchname sets the route from your CURRENT local branch to a remote branch. This makes it so you can just type git push or git pull without having to specify the remote or branch.
git reset HEAD~(number) resets current HEAD X commits backwards in the commit history
git checkout HEAD~(number) temporarily rewinds and detaches HEAD X commits back in history
git log show the commit history (q to exit)
git diff HEAD show all the changes you have made locally that are not committed (q to exit)
Merge Conflicts
Merge conflicts can look intimidating, but they aren’t in reality (unless you don’t know how to code).
When two commits change the same part of the same file, git tries to merge them, but can’t, since it would probably break the code if it guessed.
Instead, it lets you do it yourself.
It writes into the file what looks like this
<<<<<<<<<<<<<<<<<< HEAD
(version before merge)
=================
(new version)
>>>>>>>>>>>>>>>>>> commitsha
It usually does that multiple times per file. Basically compare the two, remove the markers and write the file back how it should be if both were merged into one.
Here is an example.
/proc/main()
    var/the_variable = GLOB.the_var
<<<<<<<<<<<<<<<<<< HEAD
    if(variable?.test())
=================
    if(the_variable.test()
>>>>>>>>>>>>>>>>>> commitsha
        do_something()
This would most likely be merged into this:
/proc/main()
    var/the_variable = GLOB.the_var
    if(the_variable?.test()
        do_something()
The inferred history here is the variable was named variable, and the current branch changed it to the_variable. However, another branch added the ?. operator to the proccall. When this change was merged in, Git noticed an unexpected change to the variable name and placed a merge conflict. Making sense now? The way to merge it is applying both changes as intended.
Mapping Conflicts
DMM files are impossible to merge via text, so we have tooling in the repository to automatically merge them.
Run tools/mapmerge2/Resolve Map Conflicts
If there are any conflicting tiles, you will be prompted to fix it in your map editor, then you can continue by committing the changes.
For more info, see Map Merger.
Icon Conflicts
DMI files contain multiple images, making merge conflicts always happen if the file is updated by two branches. This means solving them is relatively trivial but can be time consuming. So there’s a tool for it.
Run tools/dmi/Resolve Icon Conflicts
Automatic Merge Conflict Resolution
Also, perk of using command line, if you want git to AUTO MERGE DMI and DMM, as well as auto-cleanup your maps on commit, just run tools/hooks/Install. No need to run them manually anymore, they will run automatically if you merge or commit.
Making a basic PR with command line
First, you’ll need to clone the repository:
git clone https://github.com/BeeStation/BeeStation-Hornet/
Then, change directories into the repository with cd.
You will now need to create a branch for your changes, using the master branch for PRs is bad practice.
git branch my-pr-that-does-something
Now the branch is created, but you need to “check it out”, or switch to it:
git checkout my-pr-that-does-something
Make any changes in VSCode. When you’re done, run:
git status
Notice what files now have “unstaged changes”. Any files you do NOT want changes in, run
git checkout HEAD (filepath)
This will delete unwanted changes on your local filesystem.
Any files you DO want to PR changes to, run
git add (filepath), or if you want to add all files, use . as the filepath.
Now run git status, and confirm all the changes you want are staged.
Now you’re ready to commit. Run:
git commit -m "Put a summary of your changes here"
This will create a commit and add it to the current branch. Run git log to see the commit history. You can exit with q and navigate with arrows.
That worked, so now you just need to push the changes to your fork of the repository. So go on GitHub and press the fork button on the top right of BeeStation-Hornet, and you’ll be taken to your new fork repository. You need to add this as a remote on your local client.
git remote add fork https://github.com/(your GitHub username)/BeeStation-Hornet/ (change this to your fork’s link)
Then, you can push to a branch on your fork.
git push -u fork my-pr-that-does-something - The -u here tells Git to save that this is the path to remote. This means that when you run git push without passing a remote or branchname, it will know where to push the next time. The same applies to git pull.
Done! Now go to your fork on GitHub and refresh, you’ll see something like “changes have recently been pushed to branch my-pr-that-does-something” with a big “Open pull request” button. Press that and make sure it’s going to the main repository. You can also do this manually from the Pull Requests tab on your fork.
GitKraken
How to update your branch from master
Q. How can I resolve the map conflicts?
A. See Map Merger
Contribution guides
| |
| General | Development, Downloading the source code / hosting a server, Guide to git, Game resources category, Guide to changelogs |
| Database (MySQL) | Setting up the database, MySQL |
| Coding | Understanding SS13 code, SS13 for experienced programmers, Binary flags, Text Formatting, Guide to signals |
| Mapping | Guide to mapping, Map merger, Exploration Ruins |
| Spriting | Guide to spriting |
| Wiki | Guide to contributing to the wiki, Wikicode |
