Guide to toxins
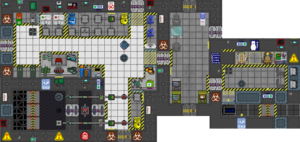
Toxins is a section of the Research and Development section of the station. There was a time when being in this place was basically a dead giveaway that you were a bad guy but with the advent of Research bombs, this is no longer the case. Instead, being a robust bomb-maker will get you praise and laudation as the crew realises you used all the bombmix to get up to 50.000 Research points rather than using it to turn the Station into a crater-ridden deathtrap. This guide is accurate as of April 2019. If you're reading this at a much later date and not getting the promised results, it's probably outdated.
Acquiring your bomb mix

Already know how to make a bomb and just want the mix? Skip to the next section. New to bomb making? Read on.
A regular bomb consists of two tanks attached to a tank transfer valve. For a finished research bomb, one of those tanks will be filled with a mix of supercooled Oxygen and Tritium (33% Tritium and 66% Oxygen at about 43K temperature), providing the boom, and another tank filled with superheated Plasma (8000-32000K temperature), providing the energy. Tritium happens when Plasma is burnt in a very Oxygen-rich environment, generally about 3%-97%. In total, we'll burn in the Toxins lab's heating chamber three of the four Oxygen canisters that we start with and then slowly trickle in Plasma and ignite it. Hot gases take up a lot of place, so we're going to want to cool the Tritium right after creating it to reduce its volume and help us store as much as possible. All the tools you need for that are in this room: Wrench, Screwdriver, Crowbar, Analyzer and RPD.
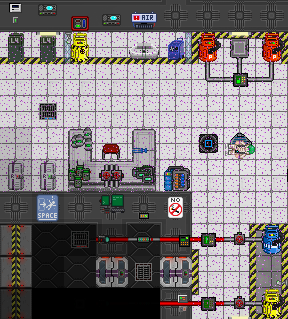
The first thing you should do in the Toxins Lab is open the interior airlock of the heating chamber, go inside the airlock and set the lower pump to 4500 kPa and re-pipe the output piping at the top. After you max out the lower pump, you can start wrenching Oxygen canisters to the bottom connector, open the valve and just let it flood in while you work. You'll want to replace the top valve with a pump (pressure or volume both work, but volume has a higher throughput and is generally used in custom pipings) and the straight pipe under the gas meter with a manifold allowing for a connection up. Replace the pressure pump you start with with a straight pipe. Regularly keep checking the Oxygen Canister to see if it's empty and replace it if it is until you have three total in. At some point you're also going to want to grab a third Portable Pump. Two can be found outside Atmospherics and are publically accessible.
To reach our target temperature of about 43.15 Kelvin, we're going to need to upgrade our Heaters/Freezers with Tier 2 Lasers, which should by now be available from the Science Protolathe in Research and Development. If not, consider liberal application of a Toolbox to your fellow scientists heads, and/or research Industrial Engineering yourself, print 4 of them and a Rapid Part Exchange Device.

After stuffing them into a Rapid Part Exchange Device, head back to your den and dismantle the Heater, move the machine frame and re-build it so it connects to your manifold under the gas meter. Screwdriver the other Freezer open and apply your RPED to it. In both cases, use your new lasers from your RPED rather than the ones that pop out of the machine when you crowbar it. Turn both freezers on and set the temperature to 43.15 Kelvin.
Note: There's no longer a need to screwdriver the freezer circuit board in order to change the setting.
Take your fourth and last Oxygen canister, wrench it to the right side of the gas filter, take one of the blue Portable Pumps and wrench it to the other side and turn the filter on without actually filtering anything.

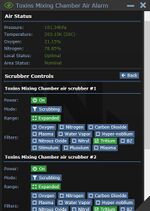
At this point, you should have three full Oxygen canisters worth in the heating chamber. Go into the airlock, set the pressure pump to 50 kPA and set the Air Alarm next to the Freezer to Scrub, Extended, Tritium (for all scrubbers in the room, if you added more). Grab a Plasma canister, wrench it to the input connector and as soon as you see purple gas going into the mix chamber, ignite it. After a few moments the fire should become blue and you'll start creating Tritium, which will automatically be scrubbed into your pipe network up to the volume pump (LEAVE THE PUMP OFF FOR NOW). The freezer will work hard to cool it down while the scrubber keeps putting hot Tritium in the pipes.
Return to the Portable Pump you left above to be filled with Oxygen and wrench it to the free Freezer. Leave it like that, take a Portable Pump and wrench it to the Output of the heating chamber but KEEP THE VOLUME PUMP TURNED OFF. The Oxygen is now cooling, your Tritium is being created. Keep analyzing the pipes with the Tritium in it. Soon, you should stop getting new Tritium (the 'mol' value will stop going up) and the temperature should approach our target 43.15. Anything below 45 is fine. Then, and only then, turn the Volume Pump on and put all the Tritium in the Portable Pump.
Keep analyzing the pipe to the left of the Volume Pump and when it's empty, unwrench the Pump and move it away. Turn the Freezer off, turn the Volume Pump off and unwrench it, then re-wrench it. Doing so will make any leftover gases in the pump vanish and clean it, as it's impossible to completely empty it out normally. The mix chamber should still be burning at this point -- if not, you either wasted too much time or made a mistake somewhere. Go to the Air Alarm and change it from scrubbing Tritium to scrubbing Plasma. Wrench the spare Portable Pump you got in your Lab and wait a bit, keep analyzing the pipes. The Plasma in the pipes should reach a temperature of at least 8000 Kelvin and will probably go higher. When it stops getting hotter, turn the Volume Pump on and fill your Portable Pump with the hot Plasma. If you have small trace amounts of Tritium in the Plasma Pump, don't worry about it.
That's it! You got all the gases you need now, and the hard part is over. Now comes the fun part - actually building the bomb and blowing it up.
Sealing the Deal - Putting Together a Bomb

If everything went right, you should have three Portable Pumps. One pump filled with about 43.15 Kelvin Oxygen, and one with hot (~8000+ Kelvin) Plasma, one with about 43.15 Kelvin Tritium.
Head to the Tank Storage Unit, grab a Plasma Tank and an Oxygen Tank, load them into the white Portable Scrubber on the right and empty your tanks completely of Plasma and Oxygen, respectively. Put one of the empty tanks in the Tritium Pump, set the target pressure to 850 kPa, set direction to in and open the valve. Wait for the tank to fill, close the valve, take the Tritium tank to the Oxygen pump and fill it up until it's full by setting the direction to in and turning the pump on at 2533 kPa pressure. Take the other tank and fill it in it's entirety with Plasma. Attach both tanks to a Tank Transfer Valve, pick up a signaler, change the signal code, screwdriver it and attach it to the Tank Transfer Valve. Place the TTV on the mass driver in the room to the right, shoot it to the bomb site and when it's there send the signal using your PDA or another signaler.
If you did everything right, the screen should shake and the machine should inform you about your success and the 50.000 research points you earned! If you want, you can turn the Intercom next to the machine on before detonating your bomb to broadcast the test results on the common radio. Of course, that won't stop the crew from asking what the hell just happened.
Guide to Maximum Capacity Bombing
So fate has decided to make you a bad guy and you've decided to use your newfound knowledge in the art of bombing to tear the station a new one. Great! If you've followed the above instructions at least once, however, you'll probably have realised that you only have enough gas mix to make a single bomb. There are, however, six Tank Transfer Valves in your table (and you can even get more from Cargo). Surely this is no coincidence? Indeed it isn't. A simple regular old Plasma-Oxygen bomb is very easy to set up and mass produce and, while awful and a waste of time in terms of research points, will be devastating if detonated strategically on the station! This part of the guide will assume you have some familiarity with working in Toxins and just highlight the bomb mix, aswell as some general tips when bombing.
Your bomb mix: Put Oxygen and Plasma in the two pumps you start with. Make sure to clean your piping inbetween to avoid contamination. Set the Freezer you start with to 85.3 Kelvin and cool Oxygen to that temperature. Upgrade your Heater with Tier 2 Lasers and set it to 853 Kelvin and heat Plasma to that temperature. Grab two tanks from the Tank Dispenser, scrub them clean, fill one with Oxygen and the other with Plasma. All done, you got yourself a maxcap! Pick a trigger, put it somewhere and detonate it. Below, you'll find the available triggers:
|
|
|
|
|
|
|
Important Note about Remote Signaling Devices
Some jokers like to randomly signal the default frequencies of these devices so before you attach one to a bomb you'll want to open its control panel by clicking it in your hand and change the frequency and code so that you don't get a nasty surprise.
Final Warning
Seriously, don't go and randomly set these off on the station if you aren't a syndicate or otherwise an antagonistic character, you WILL get job-banned or permabanned.
Don't be this guy


